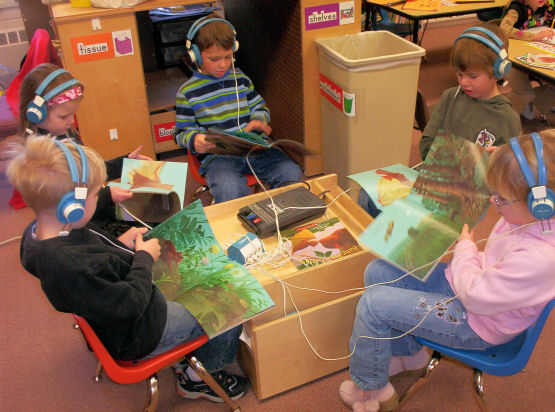
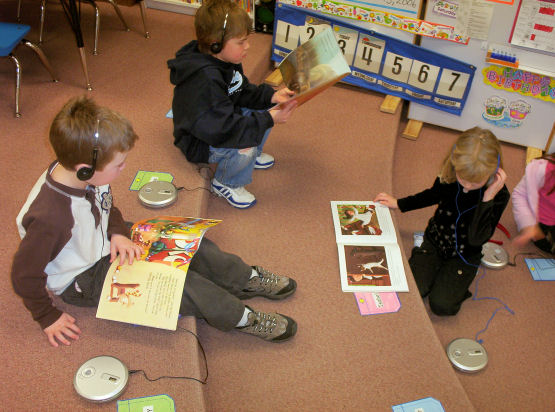
Literacy CentersMusic Big Book Center - The first center I am showing is my Music Big Book Center. This is by far the most popular center in my classroom. It is never a management problem. My students could stay there all day. The only problem I have is that the kids are singing a little too loud. For this center, you need the individual CD players. I have made Big Books to go with my CD, School is Cool, and Jack Hartmann's music. On the back of each Big Book is the individual song on a CD. The CD's are stored in adhesive sleeves from Office Max. I burn the CD (I only burn CD's that I own:) At this center, the kids choose the Big Book they want to listen to and put the CD in the player. They follow along with the text of the song in the Big Book. Check out the Big Books in School is Cool Big Books section and Jack Hartmann Big Books
Flannel Board or Pocket Chart Center - I have many different flannel board sets from Katie and Company (my good friend Julie Torkelson.) I love them! She has many, many different sets. Some are just poems, Somes are songs. Many others go with songs from CD's. I use the ones from CD's the most. The photos here show "Letter Bat"(adapted from "Vowel Bat") and "Stop Rock and Roll" from my CD, School is Cool. When the kids know a song really well, they all take turns putting up the different pieces and sing a new verse to the song.
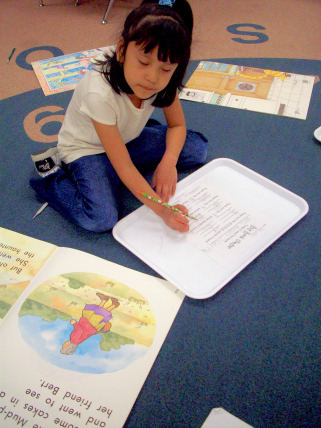
Listening Center - My kids love the listening center. It does take some training to have the kids know how to start, stop and rewind the tape. Early in the year I put book binder clips on the pages in the front of the book so they know what page to be on when the tape starts. If the story is shorter, I have the students complete a response sheet. Some are simple - draw a picture of your favorite scene. Others are more detailed.
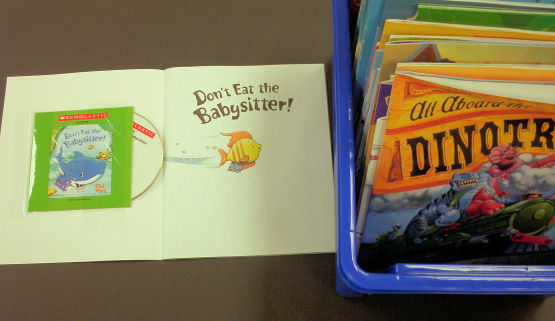
CD Listening Center - I use the individual CD players for this variation of the listening center. I buy the monthly CD and book sets from Scholastic. I tape the CD case in the front of each book. I store all of the books with CDs in a tub. At this center, the children can choose any book from the tub and and listen to it. If it is short, they can choose another one.
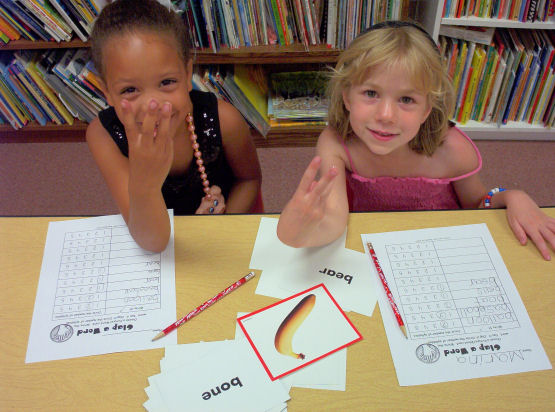
Clap the Word - For this center I put out photo cards that have the words written on the back. I use the Lakeshore Sounds Photo Library- RR993. I use these cards almost every day. The kids have to write the word on the recording sheet and then figure out how many "claps" or syllables the word has. They circle the number.
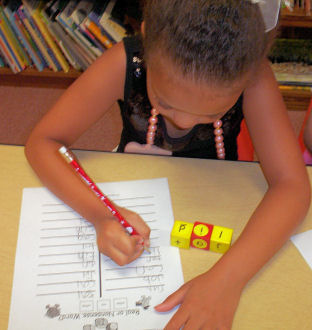
Real or Nonsense Words - For this center, each child needs 3 dice. I use 2 yellow cubes that I wrote consonants on (I picked frequently used consonants) and a red one with the vowels (1 vowel is used twice.) The child has to roll the dice and arrange the letters with the vowel in the middle. They have to decide if the word is a real or nonsense word and write it in the appropriate column. Sometimes, they are wrong because they read the word with the long vowel sound, but the practice is still good for them.
High Frequency Word Magnetic Board Writing - This center is really easy to get ready. I print up our high frequency words on labels to make all kinds of learning games quickly and easily. I just use address labels. I put the labels on different seasonal cut outs. The kids practice writing the words on the Magnetic Writing Boards. They have to read the words to a friend before they erase the word.
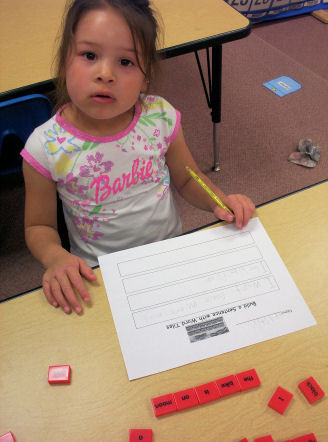
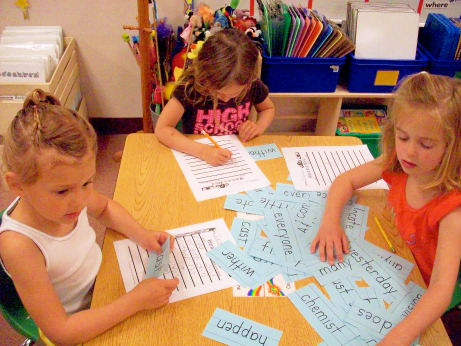
Build a Sentence Center - For this center you just need word tiles and the recording sheet. My word tiles are from Lakeshore. The kids have to create a sentence, any sentence, using the tiles. They then copy the sentence to the paper.
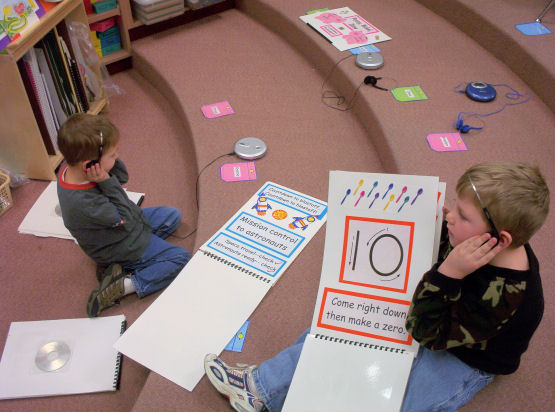
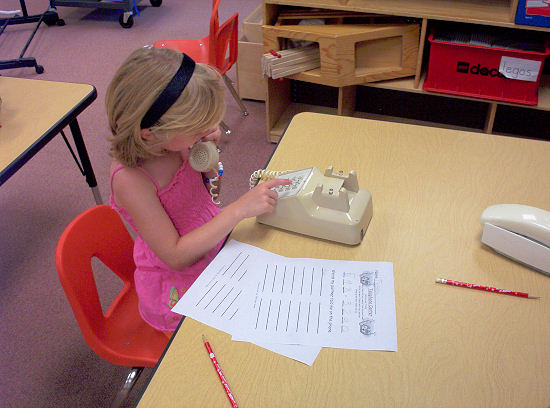
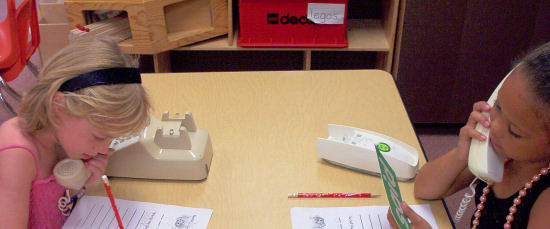
Telephone Center - For this center, each pair of students needs 2 phones. Each child needs a recording sheet. The 1st child calls his/ her friend (he/she looks at the partners sheet to know the phone number.) The partner tells them a high frequency word. The person who called writes down the word. The partner shows them the word. The child should correct the spelling if necessary. Hang up and the caller becomes the callee.
Paint Stick Sentences - For this center all you need is blank paint sticks and small picture flash cards. I bought my sticks on the internet. The flash cards are from Lakeshore. Write simple sentence frames on the paint sticks. Using flash cards the students complete the sentence. The students can copy the sentences onto paper.
Clothespin Spelling - For this center you will need paint sticks (I bought on the internet) and clothespins. Write high frequency words on the paint sticks (front and back.) Write 1 letter of the word on clothespins until the word is spelled. Store the sticks with the matching clothespins on them. The kids choose a stick, remove the clothespins one at a time and them put them back. The child should then write the word on the recording sheet. The child should say the letters as they take the clothespins on and as they take them off.
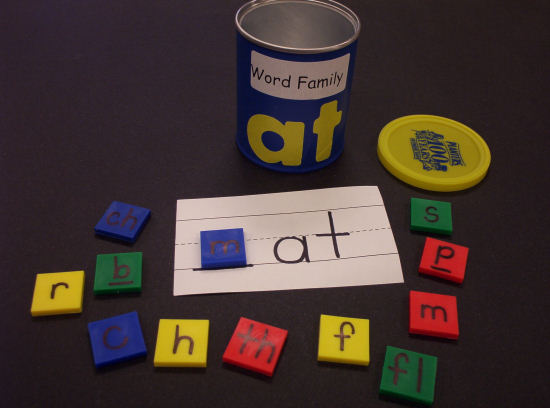
 Word Family Cans - This center will need small Pringles cans for every word family. Cover the cans with contact paper and write the word family on the outside. In each can, put the ending rime written on paper and letter tiles that can be the onset in that word family. I use blank one inch tiles and I write the letters on them with a Sharpie marker. The children take a can and write all of the words in that word family that they can build with the tiles.
 Word in a Word - My kids go bananas over this center. This year they are crazy looking for "Chunky Monkey." They are always seeing words within a word. For this center, the kids can either look through books or you can have word cards especially made that have words in words. The students write the whole word and then they write the word that is in that word.
 Word Tally - This blackline can be programmed for whatever high frequency words that you want you students to review. On the board write 5 words for the students to write on their sheet. The students should look through books and text. Every time the student finds a word, he/she marks a tally by that word.
Read the Room - Using fun pointers, have the kids "Read the Room." They can search the room for words they know how to read. They can also do this with a partner for accountability. They have to say the word out loud. When the kids read the room and then write down the words that they read.
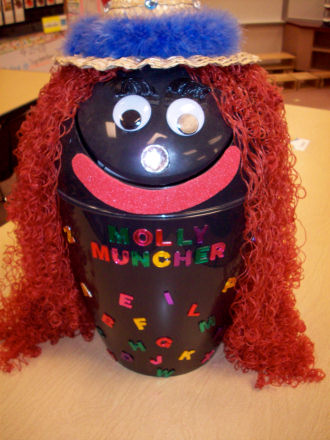
Molly Muncher - Molly Muncher can be used to reinforce any skill. The kids can feed cards with letters or pictures to Molly. Before she eats it, the kids have to say what the letter, number, word, anything is. Molly is just a garbage can that I decorated using materials from the craft store.
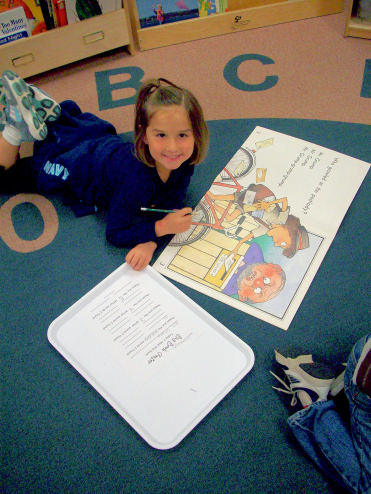
Big Book Center - For this center choose a few big books to put out that have not too many, but not too few words. There has to be a variety of words for the kids to read. The text can not repeat over and over. The children choose one book and then have to complete the form. It is difficult for the kids. I try to teach them to look at the first word and decide where to write it on the sheet. Then look at the second word. Decide where to write it. It was a great strategy to work on.
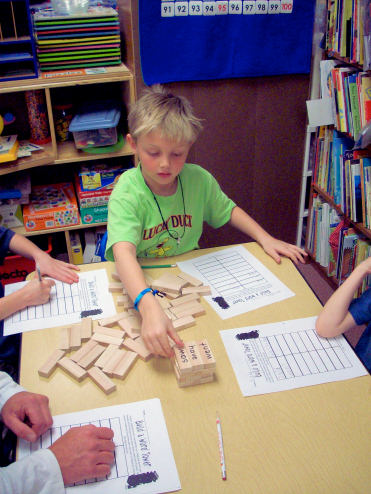
Word Tower - For this center I wrote my high frequency words on Jenga blocks. I had 2 sets because I have 6 kids at a center so I have 3 kids using each set. To play the kids turn the blocks word side down. The first child chooses a block and has to read it to his/her friends. Then he/she writes the word on the recording sheet. Then the child puts the block in the tower. The kids have to build a 3 X 3 block tower. Once they place the block, they can't readjust it. They all take turns until all the blocks have been used. When the tower is complete, they can pull out blocks like the real game of Jenga and not have the blocks fall. You can also write alphabet letters or math problems on the blocks.
Click Here for Word Tower PDF.
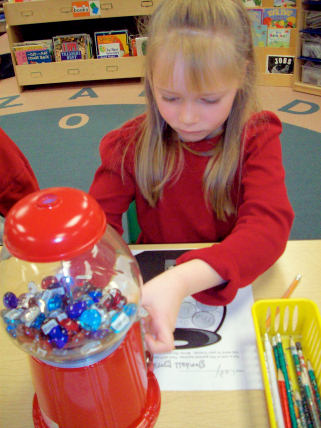
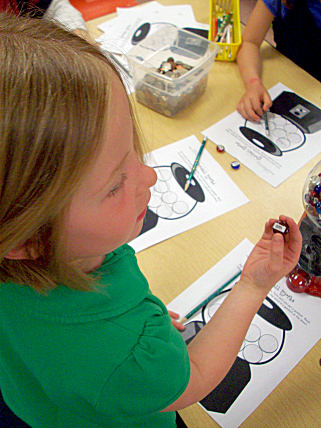
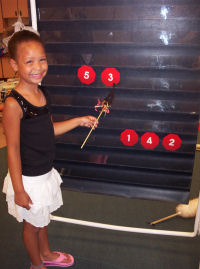
Gum Ball Words - The kids absolutely loved this center. First, you need a gum ball machine. Amazon is a great place to get one. Then you need the glass gems from craft stores. Any color is fine. I printed up dot stickers with high frequency words. I trimmed the stickers and put them on the gems. i then put 2-3 coats of Mod Podge on to seal the stickers on. Then I put the "gum balls" in the machine. To do this center, the kids take turns putting pennies into the machine. Sometimes you have to put 2-4 pennies in the machine to get a "gum ball" out. The child who put the penny in reads it to his/her friends. All the kids write it on their sheet. Everyone gets about 2 turns. When all of the circles get written in the kids just write the word and circle it.
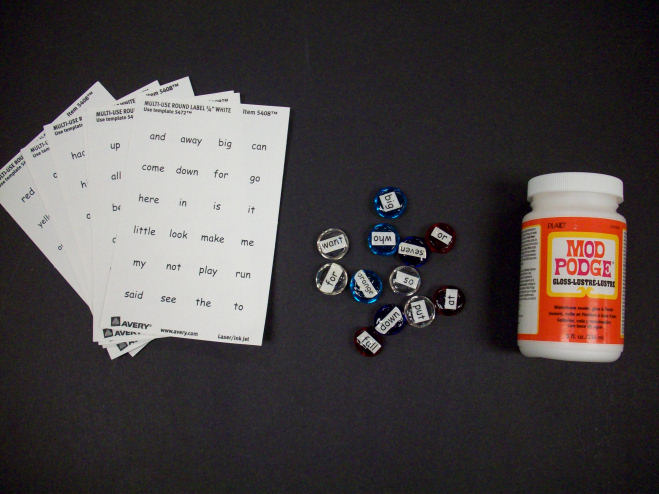
Click Here for Gum Ball Words PDF.
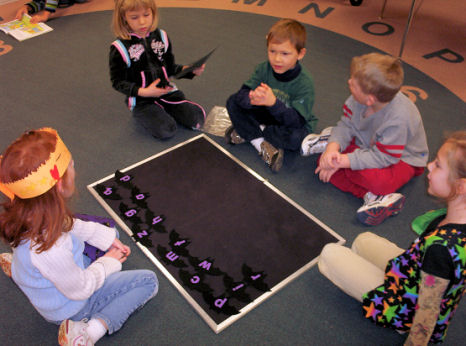
Scrabble Word Spelling - I got this idea from Kathy Kurowski and just loved it so I had to make a lot of blacklines. Thank you, Kathy. I bought 2 sets of Scrabble tiles and marked the backs so they would not get mixed up. I had my 6 kids at a center divided into 2 groups of 3. For this center all the kids have to do is find the tiles to spell the words on the sheet. They add up the points to find out how much the word is worth. When the kids finished the front side of the sheet, they went on to the back and spelled out words and added them up.
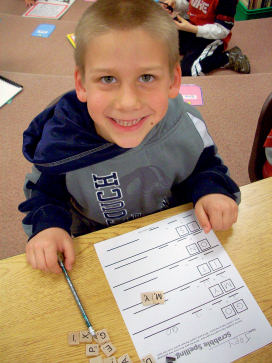 Click Here for Scrabble Words PDF 1. Click Here for Scrabble Words PDF 2. Click Here for Scrabble Words PDF 3. Click Here for Scrabble Words PDF 4. CClick Here for Scrabble Words Blank 1.. CClick Here for Scrabble Words Blank 1.
Sticker Story - For this center I put out some cute stickers. I found the cute kids ones in the scrapbooking section of your local craft store work really well. I buy them when they are 40 - 50% off. The kids just choose about 4 stickers to make a scene and they write about it.
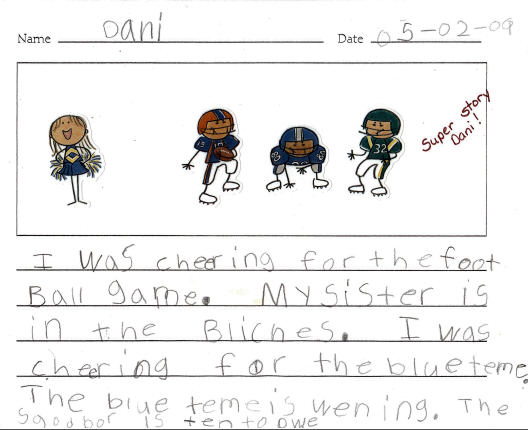
Click Here for Sticker Story PDF.
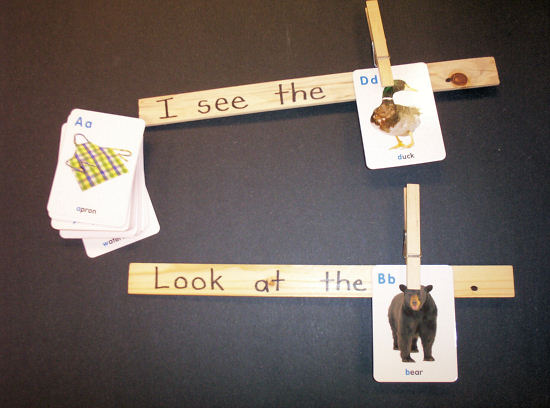
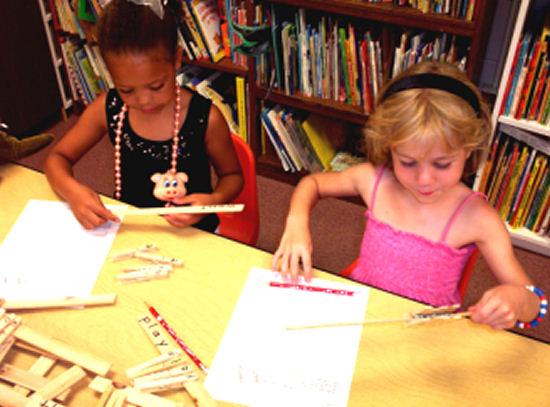
Word Family Sticks - I got this idea from Kim Jordano. Thanks, Kim. To do this center you write word family rhymes on the ends of craft sticks. I wrote 4 different ones on a stick. The kids choose a word family and write it at the top. Then the kids move the stick down the letter list. They circle the letter if it makes a real word and x out the letter if it doesn't.
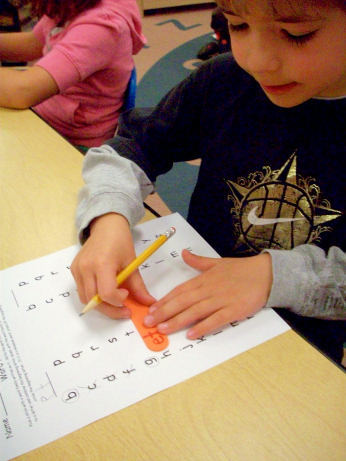 Click Here for Word Family Sticks PDF.
|